I thought since I'm diving into my unfinished projects this year, I might give a tutorial on one I've been working on. It's my Psycho 70s Apple Core project. So called because all the fabric I'm using is stuff I've been collecting for a while with a real 70's vibe to it. It's OUT THERE! This is going to be a long post broken up into two posts because it appears Blogger won't let me upload too many pictures at a time into one post. Hope I don't bore you.
So, here's my tutorial for hand piecing the apple core pattern.
First, you'll need a template. It can be made of plastic (there's plastic ones out there for purchase) or you can use a homemade one out of card board or heavy template plastic. Whatever you chose just ensure it's sturdy enough to use over and over again. I haven't posted a photo of the template because its the same as the cut pieces you see here.
 |
| Fabric cut from the template |
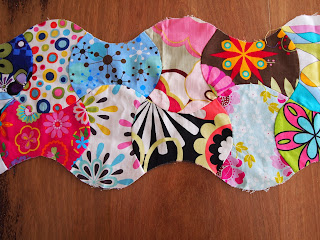
Pick your fabric. As I've explained I'm going to the 'far out' psychedelic look of more is more. I tried to use any many fabrics as possible to get the look I'm hoping to achieve. But you certainly don't have to subscribe to this formula. I've seen spectacular apple core patterns quilts using only two colours.
Start cutting. Depending on the size you're going for, start cutting as many apple core's as you need. Or cut as you go, it's up to you. I've cut a load to begin with. I haven't yet decided if I want to make a bed sized quilt, a wall hanging, or a throw. I don't mind if I have extras cut as I'll always use them in another project somewhere along the line.
Once you have an idea of how you want your quilt to look,
start arranging your apple cores in that pattern. As my project does not follow any certain configuration I can just pick up any random piece and add it to another. My only concern is that I don't want any two to be next to each other.
 |
The way the apple core's fit into each other
|
Before I go any further maybe I should talk about the
'tools of the trade'. For quilters not familiar with hand piecing the basic tools needs are extremely simple - yet elegant. Every hand piecer has their preferences and these are mine.
 |
Snippers, needle & thread, bees wax, pins and finger pincushion.
|
I always use a finger pincushion with very fine, extra long needles. I also have my thread spool on a wooden base. It just makes it easier to pull the thread from the spool when threading the needle without the spool running all over the place. Also I'm a big fan of beeswax. After the needle is threaded I run the thread through the beeswax to help keep the thread from tangling when sewing.
 |
| Thread and free standing wooden spool |
 |
| Finger pincushion with extra sharp, long needles |
 |
Beeswax
|
Once you know what pieces you want to connect to another,
do a little prep work before picking up your needle to sew.
Lets work with two pieces. Lay the first piece in front of you face up or down - it doesn't matter. From the convex edge where you're going to join this piece to there other, fold it in half lengthways and put a finger crease in the centre. Do the same with the other piece only that piece will be folded at the concave centre.
 |
| Put a finger crease in convex centre |
 |
Put a finger crease in the concave centre
|


Comments
Post a Comment