Love Entwined Centre Done

After a marathon two days of dedicated piecing, I've finished the centre mariners compass of the Love Entwined quilt. Well, almost finished - I still have to needle turn the circle onto the background fabric (which is going to be a deep patterned blue). I think I like my colour choices. I love the way the script patterned fabric turned out when it was cut into shapes and pieced. It's all from the same print but looks like pieces of numerous prints when put back together. And I decided to make ribbon roses within the outer circle instead of embroidery or appliqué because I like the texture it gives. I also decided to place my ribbon roses at the tips of each spike which reduced the number of dots indicated on the pattern from 32 to 16. I didn't think my roses would have the same impact if I made them any smaller or placed them any closer together. Plus I already had the ribbon in the colour I wanted in my sewing room.
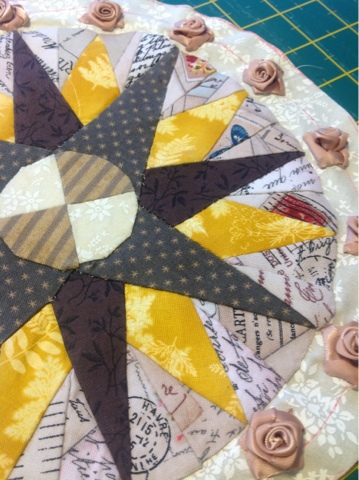
What have I learned after completing this? That if I had to do the compass over again I wouldn't have pieced it. I would have used the paper piecing technique instead. I'm an experienced hand piecer and ensured my seam allowances were spot on - but this was still a challenge for me getting the circle to be an exact circle (it isn't perfect but as perfect as I could get it without starting over again). There are just too many small pieces which means too many seams which becomes a headache to get to lie flat and round. Also I didn't add the outside ring on as a pieced unit. Instead I cut a circle to the size I wanted (including seam allowance) and appliqués the compass onto it using the needle turn method. I figure if I feel after adding the completed circle onto the background there's too much fabric bulk, I can always cut away the base behind the compass before attaching it permanently to the background fabric. Trying to neatly piece a ring around the compass would just be not only too time consuming but left too much of a possibility of stretching the fabric across the bias causing puckers in the ring when I attached it.
 |
| The pink marking is only temporary |
I'm now going to make myself a cup of tea and take a break. Over the weekend I'll jump into the next step.


Love your roses, and agree that the number and placement is right.
ReplyDeleteI love your work on the LE, the roses are so weet!
ReplyDeleteI really enjoyed reading this post, I always appreciate topics like this being discussed to us. Private tutor Westport Thanks for sharing.
ReplyDelete